HCU Unlocker
IMPORTANT: This is a paid tool which gives a limited timed license to use a properietary non open source tool. I cannot guarantee that this is safe or work for you but I can say that it has worked for me.
The above steps are based on the provided tutorial from HCU unlocker. If my steps are too confusing then following the official tutorial.
1. Download HCU Unlocker
- Downloaded from HCU Client
- Link (Backup)
2. Purchase a 72 hour license
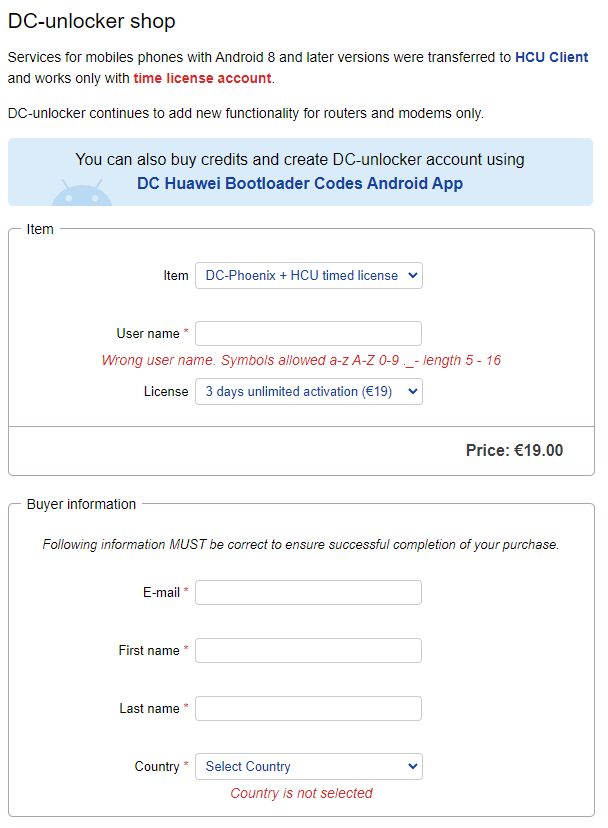
- Purchase a
DC-Phoenix + HCU timed licensefor€19.00here. - You will get a username and password pair which you can then use to login to the
HCU unlocker.
3. Login to HCU unlocker

- Login with your username and password pair. Once you start you will only have 72 hours to get read your code so make absolutely sure that you are prepared to go through with this.
4. Select CPU loader
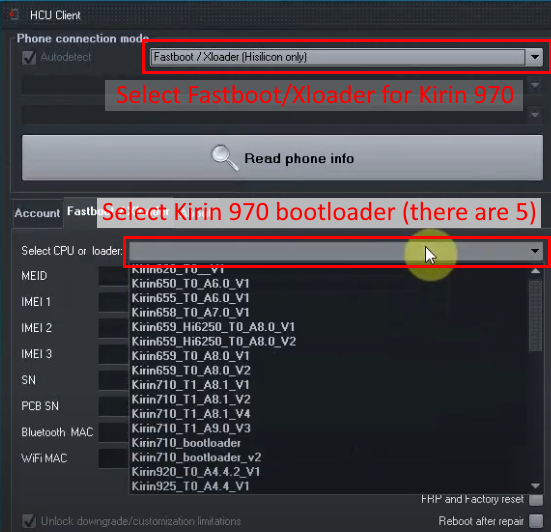
- (Optional) Check in device manager if
Huawei USB COM 1.0is present before starting. If it isn’t activate your phone in testpoint mode again. You may need to do this multiple times. - Select
Fastboot/Xloader (Hisilicon only)while your Honor Play is in testpoint modeManufacture mode - COM portsdoesn’t work for the Honor play since it uses the Kirin 970 and is using hardware testpoint mode.
- Select a CPU loader for the
Kirin 970from the menu. There are multiple options (5 for me) where only one of them will work. - Click
Read phone info. If it fails move onto the next option until it works.- Make sure that your phone is in hardware testpoint mode via device manager.
- Make sure that you are using the correct driver (I had to use Driver 1 since Driver 2 did not work for me).
My results with CPU loaders
- Honor Play COR-L29 9.1.0.399 (C636E3R1P12T8)
- You might get different results to me.
| Name | Working |
|---|---|
| Kirin 970 8.0 V1 | No |
| Kirin 970 8.0 V2 | No |
| Kirin 970 8.0 V3 | Yes |
| Kirin 970 8.1 V4 | No |
| Kirin 970 8.1 V6 | No |
5. Read bootloader unlock code
- Hopefully if it there is a working CPU loader you will get a success message on the right panel.
- Enable the checkbox
Write bootloader codewithout changing any other fields. - Click on
Repair. - Get the bootloader code from the phone information shown in the right hand panel.
- Refer to the below snippet from my own read attempt as to what you should expect.
- Refer to the tutorial linked at the head of this page for the official steps.
- Copy your bootloader code somewhere (it should be a 16 long alphanumeric code).
Bootloader User lock: locked
Phone ID: [REDACTED]
2024-08-01 22:31:42.545 Repairing...
2024-08-01 22:31:44.895 Write Bootloader code success! Code: [YOUR BOOTLOADER CODE]
2024-08-01 22:31:45.350 Write partition oeminfo...
2024-08-01 22:31:47.638 Write partition oeminfo success!
2024-08-01 22:31:47.656 Unlocking restrictions...
2024-08-01 22:31:47.687 Unlock restrictions success!
2024-08-01 22:31:47.699 Rebooting...
2024-08-01 22:31:47.731 Reboot  success!
2024-08-01 22:31:47.742 Done!
Helpful video for another model
This is a video using the tool for a different device. It is similar to the official tutorial and the steps that I used.